
Are you tired of power outages disrupting your daily life? Imagine never having to worry about losing electricity during a storm or unexpected blackout.
That’s where a Generac standby generator comes in. Setting up this reliable backup power source might seem daunting, but it’s easier than you think. In this guide, you’ll discover simple steps to hook up your Generac standby generator, ensuring your home stays powered no matter what.
Ready to take control of your energy security? Let’s dive in and make power outages a thing of the past.
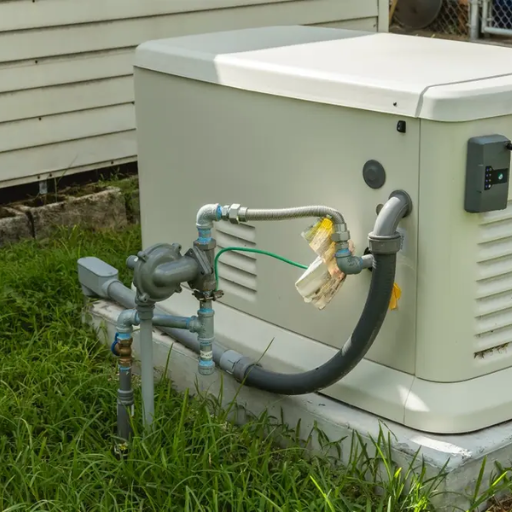
Credit: shgeneratorset.com
Choosing The Right Generator
Choosing the right generator starts with assessing your power needs. Think about the essential appliances and systems you want to run during an outage. This helps avoid buying a generator that is too small or too large.
There are different types of generatorsto consider. Standby generators connect directly to your home’s electrical system. Portable generators are easier to move but need manual setup.
Sizing your generatordepends on the total wattage of devices. Calculate the starting and running watts of each appliance. Add them up to find the minimum generator size required.
| Generator Type | Best For | Key Feature |
|---|---|---|
| Standby | Whole house | Automatic power switch |
| Portable | Small appliances | Easy to move |
Gathering Required Tools And Materials
Gathering the right toolsis key for hooking up a Generac standby generator. Essential tools include:
- Wrench set for tightening bolts
- Screwdrivers to secure panels
- Wire strippers for electrical connections
- Voltage tester to check power flow
- Drill for mounting hardware
Safety equipment protects you during installation. Have these ready:
- Insulated gloves to avoid shocks
- Safety glasses to guard your eyes
- Hard hat if working around heavy objects
- Ear protection for noisy tasks
Necessary parts ensure a smooth setup. Keep these on hand:
- Generator mounting pad
- Transfer switch for power control
- Electrical cables rated for generator load
- Conduit and fittings for wiring safety
- Fuel line and connectors
Preparing The Installation Site
Choose a flat, stable surface outside your home for the generator. It should be close to your electrical panel but not too near windows or doors. This helps keep exhaust fumes away from your living space.
Good airflow is key. The generator needs proper ventilationto avoid overheating and to safely release exhaust gases. Avoid enclosed areas or spots that block air circulation.
Check your local rules. Many places have codes and permitsfor installing standby generators. These ensure safety and legal compliance. Contact your city or county office for details.

Credit: www.reddit.com
Installing The Transfer Switch
Transfer switches control the power flow from the generator to your home. There are two main types of transfer switches:
- Manual transfer switches:You switch power by hand. They are simple and less costly.
- Automatic transfer switches:They switch power automatically when the main power fails.
Mounting the switch should be near your main electrical panel. It must be dry and easy to access. Mount it firmly on a solid surface using screws and anchors.
Wiring requires careful attention to safety and local codes. Use wires that match the generator’s capacity. Connect the switch to the main panel and generator using proper gauge wires. Always turn off power before wiring.
Connecting The Generator To The Transfer Switch
Run the conduit from the generator to the transfer switch carefully. Use PVC or metal conduit to protect wires. Keep conduit straight and secure it with straps every few feet. This prevents damage and keeps wires safe inside. Make sure conduit is long enough to reach both devices without stretching.
For electrical connections, use wires rated for outdoor use and the generator’s power capacity. Connect wires firmly to the transfer switch terminals. Match wire colors: black for hot, white for neutral, and green or bare for ground. Tighten all screws to avoid loose connections that can cause problems.
Ground the system by attaching a grounding wire to the generator’s grounding lug. Connect the other end to a grounding rod driven into the earth. This step helps prevent electrical shocks and protects the system during storms. Always check local codes for grounding requirements.
Starting And Testing The Generator
Before starting, check the fuel and oil levels carefully. Turn the generator’s fuel valve on. Make sure the battery is connected and fully charged. Switch the generator’s mode to “Auto” or “Manual” as needed. Press the start button or turn the key switch. Wait until the generator runs smoothly. Look for any unusual noises or vibrations.
Load testing helps ensure the generator works under real conditions. Connect some appliances or equipment to the generator. Turn them on one by one to add load slowly. Watch the generator’s performance and listen for any issues. Check voltage and frequency to confirm proper output. Keep the load for about 30 minutes during testing. Shut down the generator and let it cool before any changes.
| Common Issue | Possible Cause | Quick Fix |
|---|---|---|
| Generator won’t start | Low fuel or dead battery | Refill fuel, charge or replace battery |
| Generator runs rough | Dirty air filter or old oil | Clean filter, change oil |
| No power output | Tripped breaker or loose wires | Reset breaker, check wiring connections |
| Overheating | Blocked airflow or low coolant | Clear airflow, check coolant level |
Maintenance Tips For Longevity
Regular checks help keep your generator working well. Look for dirt, leaks, or damage on parts. Tighten loose bolts and clean dust from the engine. This keeps the generator ready for use.
Fuel should be fresh and stored properly. Old fuel can cause the generator to fail. Use fuel stabilizers if storing for a long time. Check fuel levels often to avoid running out.
| Season | Maintenance Task |
|---|---|
| Spring | Test the generator and change the oil. |
| Summer | Clean air filters and check the battery. |
| Fall | Inspect spark plugs and run a full test. |
| Winter | Ensure fuel is fresh and keep the unit dry. |

Credit: www.reddit.com
Frequently Asked Questions
How Do I Connect A Generac Standby Generator?
To connect a Generac standby generator, first install the transfer switch. Then, connect the generator to the transfer switch using the appropriate wiring. Ensure all connections are secure and follow local electrical codes for safety.
What Tools Are Needed To Hook Up A Generac Generator?
You need basic electrical tools like wire strippers, screwdrivers, pliers, a voltage tester, and a drill. Also, have conduit, wires, and connectors specific to your generator model ready for installation.
Can I Install A Generac Generator Myself?
Yes, if you have electrical experience and follow safety codes. However, hiring a licensed electrician is recommended to ensure proper and safe installation.
How Long Does It Take To Install A Generac Generator?
Installation typically takes 4 to 8 hours, depending on site complexity. Professional installations may be quicker due to experience and proper tools.
Conclusion
Hooking up a Generac standby generator can keep your power steady. Follow each step carefully to ensure safety and success. Double-check all connections before turning the generator on. This helps avoid damage and keeps your home protected. Taking time now saves frustration later.
Stay prepared for power outages with confidence and ease. Your home will thank you when the lights stay on.