Are you tired of unexpected power outages disrupting your daily routine? Imagine never having to worry about spoiled food, interrupted work, or being left in the dark during a storm.
Installing a standby generator could be the solution you’ve been searching for. It’s like having a reliable friend who always has your back, ready to keep your home running smoothly no matter what happens. In this guide, you’ll discover exactly how to install a standby generator, ensuring peace of mind and uninterrupted comfort for you and your family.
Ready to take control of your power supply? Let’s dive into the steps that will transform your home into a self-sufficient powerhouse.
Choosing The Right Generator
Standby generators come in different types. The two main kinds are air-cooledand liquid-cooled. Air-cooled models are smaller and fit well for homes. Liquid-cooled generators are larger and better for big places. Both work automatically during power cuts.
Choosing the right sizeis key. A small generator might not power your whole house. A big one costs more and wastes fuel. Check the total watts your home needs. Add a bit more for safety. This helps pick a generator that fits.
| Fuel Type | Advantages | Disadvantages |
|---|---|---|
| Natural Gas | Clean, unlimited supply if connected | Needs gas line connection |
| Propane | Long shelf life, portable | Needs tank refilling |
| Diesel | Powerful, good for big loads | Louder, requires fuel storage |
Preparing The Installation Site
Choose a flat and stable areafor the standby generator. It should be away from windows and doors. This helps avoid noise and fumes entering your home. Check that the spot is close to the main power panel for easy connection.
Clear the site of any debris, plants, and loose soil. Level the ground to create a firm base. A concrete pad or gravel bed is often used to keep the generator steady and dry.
| Local Code | Requirement |
|---|---|
| Distance from Building | Usually 5-10 feet away |
| Noise Limits | Must meet local sound rules |
| Ventilation | Clear airflow for safe exhaust |
| Permits | Check if a permit is needed |
Gathering Tools And Materials
Essential toolsinclude a wrench set, screwdriver, drill, and voltage tester. These tools help with tightening bolts, drilling holes, and checking electrical connections. A pipe wrench and pliers are also needed for handling pipes and wires.
Required materialsconsist of the standby generator, transfer switch, conduit, and electrical cables. You will also need fuel lines and connectors suitable for your generator model. Don’t forget mounting brackets and grounding rods.
Safety gearis very important. Wear insulated gloves, safety glasses, and ear protection. Use a hard hat if working near heavy objects. Safety shoes can protect your feet from sharp or heavy items. Always have a fire extinguisher nearby for emergencies.
Installing The Generator Base
Start by choosing a flat, level spot for the concrete pad. This spot must be large enough to hold the generator base and allow space for maintenance.
Use wooden forms to shape the pad. Mix concrete and pour it evenly inside the forms. Smooth the surface with a trowel. Let the concrete cure for at least 24 hours before placing the generator.
Ensuring stability is key. The concrete pad must hold the generator’s weight firmly without shifting. Use rebar or wire mesh inside the concrete to strengthen it.
Vibration isolation helps protect both the generator and the building. Place rubber pads or vibration isolators between the generator and the concrete. This reduces noise and wear from vibrations.
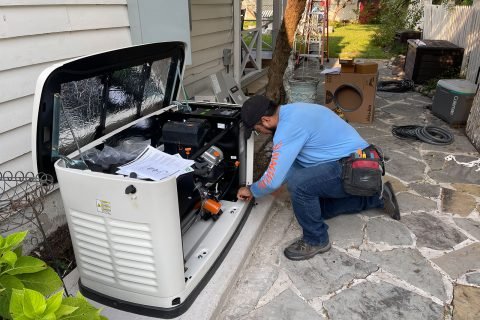
Connecting Electrical Components
Wiring the transfer switch requires care. Connect the generator wires to the correct terminals. This switch moves power from the utility to the generator safely. Use wires that match the generator’s size and type. Keep all connections tight and secure.
Grounding the generator is very important. It protects from electric shocks. Attach a grounding wire from the generator to a grounding rod or metal water pipe. Make sure the ground is solid and meets local rules.
Testing electrical connections ensures safety and function. Turn on the generator and check if power flows correctly. Look for loose wires or sparks. Use a voltage tester to confirm correct current. Fix any issues before full use.

Credit: aquariushomeservices.com
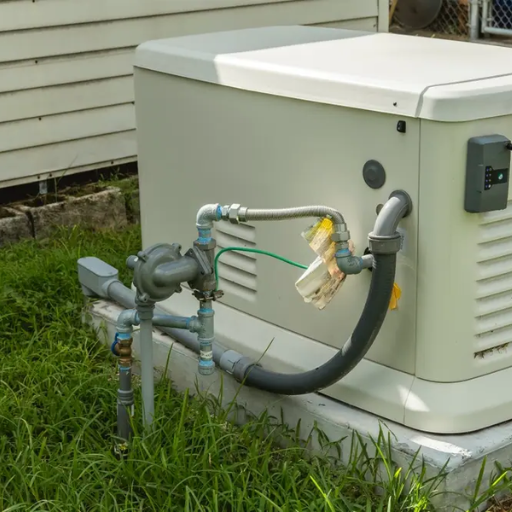
Hooking Up The Fuel Supply
Fuel lines must be installed with care. Use approved materialsfor safety. Connect lines tightly to avoid leaks. Keep lines clear of sharp edges and heat sources. Secure all connections with clamps or fittings.
Check for leaks by running fuel through the lines slowly. Watch for any signs of dripping or smell of fuel. Use a soap solutionon joints to spot small leaks. Tighten connections if leaks appear. Never ignore even small leaks.
Fuel storage must be safe. Store fuel in approved containersonly. Keep containers in a cool, dry placeaway from sunlight. Ensure good ventilation around storage areas. Do not store fuel near sparks or flames. Regularly inspect containers for damage or leaks.
Final Safety Checks
Check all wiring and connections for tightness and proper placement. Confirm the generator is securely mounted and level. Make sure all fuel lines have no leaks. Verify the exhaust system directs fumes away from buildings and windows.
Start the generator and listen for unusual sounds. Observe the control panel for any error messages or warnings. Test the transfer switch to see if power switches smoothly between utility and generator. Run the generator under load to ensure it supplies steady power.
- Locate the emergency stop button or switch.
- Practice shutting down the generator quickly.
- Check that the shutdown stops the engine immediately.
- Review safety protocols for emergency situations.
Credit: shgeneratorset.com
Maintenance Tips For Longevity
Perform inspections regularlyto catch problems early. Check for leaks, loose parts, and dirt build-up. Keep a logof inspection dates and findings to track maintenance history.
Fuel system care includes using fresh fuel and adding stabilizers. Drain old fuel to avoid clogging. Clean or replace fuel filters to ensure smooth operation.
Maintain the battery by checking its charge and cleaning terminals. Replace the battery if it cannot hold a charge. Change oil at least once a year or after 100 hours of use. Use the oil type recommended by the manufacturer for best results.

Credit: www.youtube.com
Frequently Asked Questions
What Tools Are Needed To Install A Standby Generator?
You need a wrench set, screwdriver, drill, voltage tester, and pipe wrench. Safety gear like gloves and goggles is essential too. Proper tools ensure a safe and efficient installation process.
How Long Does It Take To Install A Standby Generator?
Installation typically takes 4 to 8 hours. Time varies based on generator size and site complexity. Professional installation ensures safety and proper setup.
Can I Install A Standby Generator Myself?
DIY installation is possible but not recommended. It involves electrical and gas connections requiring expertise. Hiring a licensed professional ensures compliance with codes and safety.
Where Should I Place My Standby Generator?
Place it outdoors on a flat, stable surface. Ensure it’s away from windows, vents, and doors. Proper placement prevents hazards and ensures optimal ventilation.
Conclusion
Installing a standby generator keeps your home powered during outages. Follow safety rules and local codes to avoid problems. Choose the right size for your power needs. Regular maintenance helps the generator work well for years. Trust experts if you feel unsure about the process.
A standby generator offers peace of mind and comfort. Stay prepared, stay safe, and enjoy reliable power when you need it most.