If you want your generator to run smoothly and last longer, changing the oil filter is a must. Skipping this simple step can lead to costly repairs and unexpected breakdowns when you need power the most.
But don’t worry—replacing your generator’s oil filter is easier than you think. In this guide, you’ll learn exactly how to do it quickly and safely, saving you time and money. Keep reading to make sure your generator stays in top shape!

Credit: www.reddit.com
Tools And Materials Needed
Essential tools and materialsensure a smooth oil filter change. Gather these items before starting:
- Wrench setto remove the old oil filter.
- Oil filter wrenchfor tight filters.
- New oil filtermatching your generator model.
- Drain panto catch old oil.
- Clean ragsto wipe spills and hands.
- Fresh engine oilas recommended by the manual.
- Glovesfor hand protection.
- Funnelto pour oil without spills.
Having all these ready helps avoid interruptions and keeps the process clean.

Credit: www.reddit.com
Prepare The Generator
Start by turning off the generator and letting it cool down. This prevents burns and other injuries. Find a clean, flat workspace near the generator to place tools and parts.
Gather all necessary tools like a wrench, oil catch pan, and a new oil filter. Wear gloves to keep your hands clean and safe. Have some rags or paper towels ready for spills.
Check the generator manual for specific instructions and the right oil filter type. Make sure the generator is on a stable surface to avoid accidents during the replacement.
Locate The Oil Filter
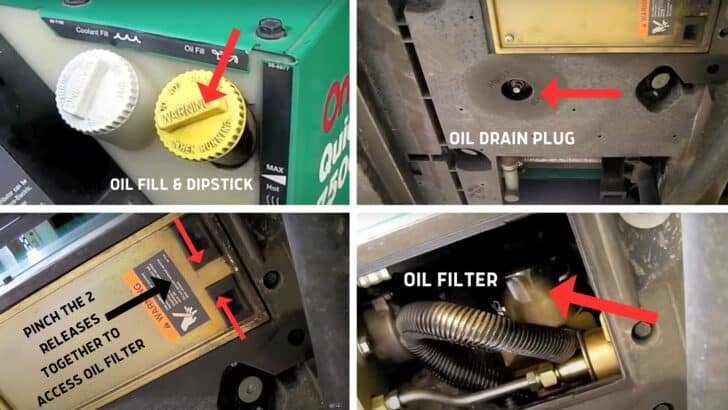
The oil filteris usually near the engine block. It looks like a small metal canister. Most generators have the oil filter on the side or bottom. It might be hard to see without moving parts. Use a flashlight if needed.
Check the owner’s manualto find the exact location. Some filters are hidden behind covers. Make sure the generator is off and cool before touching it.
- Look for a round, metal filter with a screw-on design.
- Note the filter’s position to help install the new one correctly.
- Keep a rag handy to clean any oil spills.

Credit: jdbelcher.com
Drain The Old Oil
Place a container under the oil drain plug to catch old oil. Use a wrench to carefully loosen and remove the plug. Let the oil drain completely; this might take a few minutes. Be careful, as the oil may be hot. After draining, clean the drain plug and replace its washer if needed. Screw the plug back tightly to stop leaks. Dispose of the used oil safely at a recycling center. Never pour oil on the ground or in drains. Proper draining helps keep the generator running smoothly.
Remove The Old Oil Filter
Make sure the generator is off and cooled down. Place a container under the oil filter to catch old oil. Use an oil filter wrench to turn the filter counterclockwise. Be careful; oil may spill out. Remove the filter by hand once it’s loose. Check the filter mounting area for dirt or old gasket pieces. Clean the area with a rag. Dispose of the old filter properly. Avoid touching the filter’s sealing surface to keep it clean.
Install The New Oil Filter
Before placing the new oil filter, apply a thin layer of clean oil on its rubber seal. This helps the seal fit tightly and prevents leaks. Screw the filter onto the generator’s filter mount by hand. Turn it gently until the seal touches the base. Then, tighten it about three-quarters of a turn more. Avoid using tools to over-tighten; this can damage the filter or seal.
Make sure the filter is snug but not too tight. After installation, check for leaks once the generator runs. Tighten slightly if any oil drips appear. Proper filter installation helps keep the generator’s engine clean and running well.
Refill With Fresh Oil
Make sure the engine is cool before adding oil. Use the oil type recommended in the generator’s manual. Pour the fresh oil slowly into the filler hole to avoid spills. Check the oil level with the dipstick. Add oil little by little until it reaches the full mark on the dipstick. Avoid overfilling, as this can damage the engine. After filling, securely close the oil filler cap to prevent leaks. Clean any spilled oil around the filler area to keep the generator clean. Run the generator for a few minutes and then turn it off. Wait a few minutes and check the oil level again. Top up if necessary. Proper oil levels help the generator run smoothly and last longer.
Check For Leaks And Test
After replacing the oil filter, check carefully for any oil leaks. Look around the filter and oil drain plug. Use a cloth to wipe off excess oil. This helps spot fresh leaks quickly.
Start the generator and let it run for a few minutes. Watch the filter area closely. No oil should drip or spray out. A small leak can cause engine damage.
Listen for strange noises. The generator should run smoothly and quietly. If you hear knocking or rattling, turn it off immediately.
Check the oil level again after the test run. Use the dipstick to ensure it is at the correct level. Add oil if needed, but do not overfill.
- Inspect filter and drain plug for tightness.
- Wipe off any spilled oil.
- Run generator for a few minutes.
- Watch and listen for leaks or noises.
- Check oil level and add if needed.
Tips For Maintenance
Regular maintenance keeps your generator running smoothly and lasts longer. Always use the correct oil filtertype for your model. Before replacing, turn off the generatorand let it cool down to avoid burns.
Drain the old oil carefully to prevent spills. Use a clean rag to wipe the filter area. Apply a thin layer of oil on the new filter’s seal to help it fit tight and prevent leaks.
- Check the oil level after replacing the filter.
- Dispose of old oil and filters properly to protect the environment.
- Keep a maintenance schedule for timely oil and filter changes.
Frequently Asked Questions
How Often Should I Replace A Generator Oil Filter?
Replace the generator oil filter every 100 to 200 hours of use. Check the manufacturer’s guide for specific intervals. Regular replacement ensures optimal engine performance and prevents damage from contaminated oil.
What Tools Do I Need To Replace The Oil Filter?
You need an oil filter wrench, drain pan, socket set, and clean rags. These tools help you remove the old filter safely and install the new one efficiently.
Can I Use Any Oil Filter For My Generator?
No, always use the oil filter specified by your generator’s manufacturer. Using the wrong filter can cause poor filtration and damage the engine.
What Are The Signs Of A Clogged Generator Oil Filter?
Signs include reduced engine performance, overheating, and unusual noises. A clogged filter restricts oil flow, which can harm the engine if not replaced promptly.
Conclusion
Changing the generator oil filter is simple. Follow the steps carefully. This ensures your generator runs efficiently. Regular maintenance prevents costly repairs. Clean tools and workspace help a lot. Safety gear protects from spills and injuries. Remember to dispose of old oil responsibly.
Check the manual for specific instructions. Practice makes the process quicker. Your generator will thank you with reliable performance. Keep these tips in mind for a smooth experience. Happy maintaining!