
Is your generator acting up, and you’re suspecting the temperature sensor might be the culprit? You’ve come to the right place!
A faulty temperature sensor can cause your generator to malfunction, leading to unexpected shutdowns or even costly repairs. But don’t worry; troubleshooting this issue doesn’t have to be a daunting task. In this guide, you’ll learn straightforward steps to identify and fix problems with your generator’s temperature sensor.
By the end of this article, you’ll have the confidence and knowledge to tackle the issue head-on, ensuring your generator runs smoothly and efficiently. So, let’s dive in and get your generator back to its peak performance!

Credit: www.amazon.com
Common Temperature Sensor Issues
Signs of a faulty sensorinclude the generator overheating or shutting down unexpectedly. A sensor that shows inconsistent or no temperature readings also signals a problem. Sometimes, the engine warning light may turn on. These signs often mean the sensor is not working right.
Causes of sensor malfunctioncan be dirt or oil buildup on the sensor surface. Wiring issues like loose connections or broken wires also cause errors. Exposure to extreme heat or cold might damage the sensor. Old sensors may simply wear out and stop working properly.
Tools Needed For Troubleshooting
Essential diagnostic tools help find problems with the temperature sensor. A multimeterchecks voltage and resistance. This tool shows if the sensor works right. A scan toolreads error codes from the generator’s computer. It helps locate sensor faults quickly. A temperature sensor testercan simulate sensor signals to test the system response.
Safety equipment keeps you safe during troubleshooting. Insulated glovesprotect from electric shocks. Safety glassesguard eyes from sparks or debris. Wear long sleevesand closed shoesto avoid burns or cuts. Always work in a dry, well-lit areato prevent accidents.
Step-by-step Sensor Testing
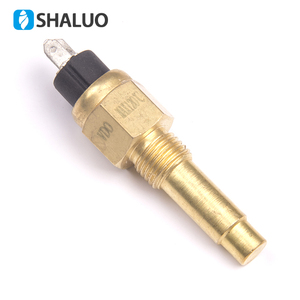
The temperature sensor is usually near the engine block or radiator. Check the generator’s manual to find the exact spot. The sensor looks like a small metal probe with a wire connected to it. Make sure the generator is off before touching the sensor.
Use a multimeter to check the sensor’s resistance. First, unplug the sensor’s wire connector. Set the multimeter to the resistance (ohms) setting. Connect the multimeter leads to the sensor terminals. Slowly heat or cool the sensor with warm water or ice. Watch how the resistance changes.
| Resistance (Ohms) | Temperature (°C) | Meaning |
|---|---|---|
| High (10k+) | Cold (0-10°C) | Sensor works normally |
| Medium (1k-10k) | Warm (20-50°C) | Sensor shows proper change |
| Low (Under 1k) | Hot (Above 50°C) | Sensor reacts correctly |
| Infinite or zero | Any | Sensor is likely faulty |
Quick Fix Techniques
Cleaning sensor connectionshelps remove dirt and rust. Use a soft cloth or brush to clean them gently. Make sure the sensor is dry before reconnecting.
Tightening loose wiresprevents bad signals. Check all wire ends and screws. Use a screwdriver to make sure wires are snug but not too tight.
Resetting the sensor systemcan fix small errors. Turn off the generator first. Wait a few minutes, then turn it back on to reset the sensor.
Replacing The Temperature Sensor
Choose a sensor that matches your generator’s model and specs. Sensors come in different types like thermistors or thermocouples. Check the sensor’s temperature range to suit your generator’s needs. Using the wrong sensor can cause false readings or damage.
Before installing, turn off the generator and disconnect the power. Handle the sensor carefully to avoid damage. Clean the sensor port area to remove dirt or oil. Connect wires firmly and check for correct placement.
Test the new sensor by running the generator briefly. Watch the temperature readings to ensure they are stable. Secure the sensor and wiring to avoid loose connections.

Credit: www.youtube.com
Preventive Maintenance Tips
Set a regular inspection schedulefor the generator temperature sensor. Check the sensor at least once a month. Look for signs of wear, corrosion, or loose connections. Clean the sensor gently with a soft cloth. Avoid harsh chemicals that can damage it. Keep a log of all inspections to track sensor health over time.
Protect the sensor from damage by avoiding physical shocks and exposure to extreme temperatures. Make sure the sensor wiring is secure and not rubbing against sharp edges. Use proper covers or shields if the sensor is in a risky location. Replace damaged parts promptly to prevent sensor failure.
Credit: www.alibaba.com
Frequently Asked Questions
What Causes A Generator Temperature Sensor To Fail?
A generator temperature sensor can fail due to dirt buildup, corrosion, wiring issues, or sensor wear. Overheating and vibration may also damage the sensor. Regular maintenance helps prevent these problems and ensures accurate temperature readings.
How Do I Test A Generator Temperature Sensor?
To test a generator temperature sensor, use a multimeter to check resistance. Compare the readings to the manufacturer’s specifications. If the sensor shows irregular or no resistance, it likely needs replacement.
Can A Faulty Temperature Sensor Damage My Generator?
Yes, a faulty temperature sensor can cause overheating or shutdowns. It may send incorrect data, leading to engine damage. Prompt sensor troubleshooting prevents costly repairs and extends generator life.
How Often Should I Inspect The Temperature Sensor?
Inspect the temperature sensor every 6 to 12 months or during routine generator maintenance. Frequent checks ensure early detection of faults and maintain optimal generator performance.
Conclusion
Troubleshooting a generator temperature sensor is key to keeping it safe. Check the sensor and wiring carefully. Clean or replace parts if needed. Watch for unusual temperature readings to catch problems early. Regular checks help avoid big repairs later. Stay patient and follow steps one by one.
This keeps your generator running smooth and reliable. Simple care makes a big difference in performance and safety.