Wiring a generator remote start system might sound complicated, but it doesn’t have to be. If you want the convenience of starting your generator without leaving your house or workspace, this guide is for you.
You’ll learn simple, clear steps to get your remote start system up and running quickly and safely. By the end, you’ll have the confidence to control your generator with ease—saving you time and effort when you need power the most.
Keep reading, and let’s make your generator smarter together.
Tools And Materials Needed
Essential toolsand materialsmake wiring a generator remote start system easier. A multimeterhelps check electrical connections safely. Wire strippers remove insulation without damage. Use crimp connectorsfor strong, secure wire joins. Electrical tape or heat shrink tubing protects connections from moisture and wear.
- Remote start module designed for your generator
- 12-volt wires (various lengths)
- Relay switches for safety and control
- Screwdrivers and pliers for assembly
- Battery connectors and terminals
- Safety gloves and goggles
Organizing these items before starting can save time and reduce errors. A clear workspace helps keep everything in reach and clean. Safety gear protects against electric shock and injury.
Safety Precautions
Always disconnect the generatorfrom power sources before starting. Ensure the area is dry and freefrom any flammable materials. Wear protective gloves and gogglesto avoid injuries. Use tools with insulated handlesfor wiring tasks. Double-check all wiring connections for correct placementand secure attachment. Keep children and pets awayfrom the work area to prevent accidents. Avoid working in wet conditionsto reduce risk of electric shock.
Follow the generator manufacturer’s instructions closely. Use wires rated for the generator’s voltage and current. Label wires clearly to avoid confusion during installation or repairs. Test the system with a multimeterbefore finalizing connections.
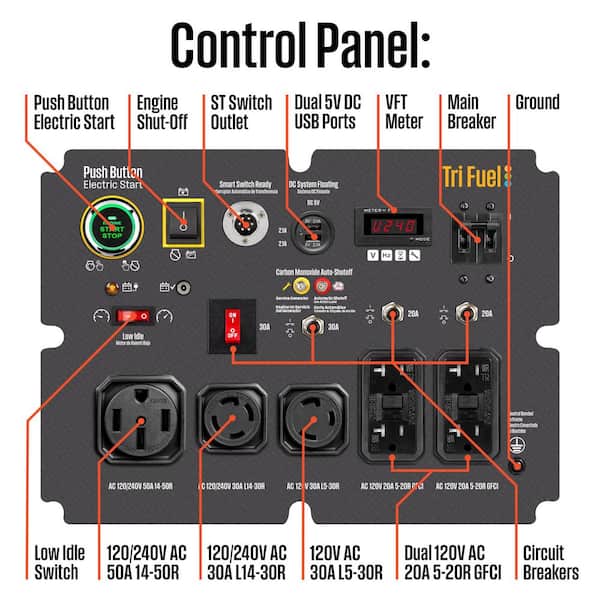
Locate The Generator Control Panel
The generator control panelis the key area to begin wiring a remote start system. It usually sits on the generator’s side or front. This panel holds all the control switches and connections needed to operate the generator. Locate it carefully by checking the user manual or the generator’s exterior.
Inside the panel, look for the remote start terminals. These are often labeled clearly to help identify where to connect wires. Sometimes, these terminals are near the main control board or near the start/stop switches.
Be sure the generator is turned off and disconnected from power before opening the panel. Safety first. Use a flashlight if the area is dark to see the small labels and wiring clearly.

Credit: westinghouseoutdoorpower.com
Identify Remote Start Wires
Check the manufacturer’s manualcarefully. It shows the exact location of remote start wires. Manuals give wire colorsand functions. This helps avoid mistakes. Follow the manual’s wiring diagram step by step.
Use a multimeterto test wires. It checks for voltageand continuity. Multimeter testing confirms wire identity. Connect the multimeter probes to wires. Look for power signalswhen the ignition is on. This ensures correct wiring for the remote start system.
Prepare The Remote Start Module
Check the remote start modulecarefully for any damage or loose parts. Make sure all connectors are clean and free from dust. A damaged module can cause problems later.
Look at the wires coming out of the module. Each wire has a specific function. Understanding these wires is importantbefore starting any connection.
| Wire Color | Function |
|---|---|
| Red | Power supply (12V) |
| Black | Ground connection |
| Yellow | Starter signal |
| Green | Ignition signal |
Keep the wiring diagram handy. It helps match each wire to the right place. Double-check all connections before moving on.

Credit: generator-line.com
Connect Power Supply Wires
First, find the battery terminalson your generator. The positive terminalusually has a red cover or a plus (+) sign. The negative terminalis often black or marked with a minus (−) sign.
Attach the positive leadof the remote start system to the positive battery terminal. Secure the connection tightly to avoid loose contact.
Next, connect the negative leadto the negative battery terminal. Make sure this connection is firm to ensure proper grounding.
Use insulated tools to prevent short circuits. Double-check all connections before powering the system.
Wire The Remote Start Signal
The start signal wireis vital for the remote start system. Locate this wire in the generator’s wiring harness. It usually connects to the ignition switch or starter relay. Use the generator’s manual to find the exact wire color and location.
Once identified, strip a small section of the wire’s insulation carefully. Avoid cutting the wire strands to keep a strong connection.
- Twist the exposed wire strands tightly.
- Attach the remote start signal wire to the exposed section.
- Use a soldering iron or a wire connector for a secure join.
Wrap the connection with electrical tape or heat shrink tubing. This protects against moisture and vibration. A secure connectionensures reliable remote starting without signal loss.
Credit: www.homedepot.com
Ground The System
Grounding the system is essentialfor safety and proper operation. Connect the ground wire to a clean metal surfaceon the generator or frame. Avoid painted or rusty areas to ensure a solid connection. Use a ring terminalto attach the wire securely.
This step prevents electrical shocksand interference. Check that the ground wire is not looseor damaged. A poor ground can cause the remote start system to malfunction.
Test The Remote Start Function
Turn on the generator’s main power switch. Wait a few seconds for the system to stabilize. Check that all connections are secure and the battery has enough charge.
Press the remote start button once. The generator should start without any delays. Listen for the engine sound and watch the indicator lights on the panel.
Watch for common problems during testing:
- Remote does not respond – check battery in the remote.
- Generator won’t start – verify all wiring connections.
- Engine stops immediately – inspect fuel supply and safety switches.
| Issue | Possible Cause | What to Do |
|---|---|---|
| Remote no response | Dead remote battery | Replace remote battery |
| Generator won’t start | Loose wiring | Secure all wire connections |
| Engine stops quickly | Fuel or safety issue | Check fuel level and safety switches |
Final Wiring Checks
Carefully check all connectionsto ensure they are firm. Loose wires can cause malfunctionsor failures. Use a multimeterto test continuity where needed. Make sure no wires are frayedor damaged. Replace any faulty wires immediately.
Secure all wires using cable ties or clamps. Keep wires away from hot or moving parts. This protects against wearand short circuits. Organize wires neatly to avoid confusion during future checks.
- Double-check terminal screws are tight.
- Verify wire insulation is intact.
- Confirm wires match the wiring diagram.
- Test the system briefly before final assembly.
Frequently Asked Questions
How Do I Wire A Generator Remote Start System?
To wire a generator remote start system, connect the remote starter module to the generator’s control panel. Use the manufacturer’s wiring diagram for correct wire placement. Ensure all connections are secure and insulated to avoid shorts or damage. Test the system before regular use.
What Tools Are Needed For Wiring Remote Start?
You will need wire strippers, screwdrivers, a multimeter, electrical tape, and possibly a drill. These tools help strip wires, secure connections, and test circuits. Having the right tools ensures a safe and efficient wiring process for your generator remote start system.
Can I Wire A Remote Start System Myself?
Yes, if you have basic electrical knowledge and follow the instructions carefully. Always refer to the generator’s manual and wiring diagram. If unsure, consult a professional electrician to avoid safety risks or damage to your generator.
How To Troubleshoot Remote Start Wiring Issues?
Check all wire connections for tightness and correct placement. Use a multimeter to test voltage and continuity. Inspect for damaged wires or blown fuses. Reset the remote start system and test again. Refer to the manual for specific troubleshooting steps.
Conclusion
Wiring a generator remote start system is not too difficult. Follow the steps carefully to ensure safety. Use basic tools and follow instructions closely. Test the system once everything is connected. Make sure all wires are secure and connections are tight.
Double-check every step to prevent issues later. A well-installed system offers convenience and reliability. Remember, safety comes first. Consult a professional if you feel unsure. This guide helps simplify the process for you. Happy wiring and enjoy the ease of remote starts!